Showing posts with label clothes upcycling. Show all posts

Monday, 18 January 2016

Lunch bag Tutorial


My eldest daughter was in need of a new lunch bag for school this year as her old one was falling apart. So I dissected the old bag and made a new pattern and tutorial to make her a new one.


I made 3 bags in total. For the materials I used waterproof fabric for the outer fabric in two of the bags and rip-stop nylon for the inner fabric. The long zips were reclaimed from the above old lunch bag and old school bags. For the insulating layer between the inner and outer fabric I used foam sheets reclaimed from old lunch bags and some pieces of old silver car windscreen shades. Finally for the handle, I used parts of straps reclaimed from old backpacks.

For the bag I made to produce this tutorial, I used an old pair of jeans and an old favourite nightie of my daughter's for the outer fabric 
and for the inner, I used sections cut from an old pool toy - an inflatable ring that somehow got a puncture!

I used the Hello Kitty Pictures from the nightie as applique to add to the plain denim from the jeans for the outer fabric.
The pictures were a little sticky and glittery, so I used a thin piece of tissue paper on the top when I stitched around the edges. this helped the machine foot slide across the fabric better, and when I was finished the stitching the excess tissue just pulls off.


So - here's how to make your own lunch bag.

First cut your materials.
You will need

 Outer and Inner fabric
2 main panels each - outer and inner fabric template - click here for free download
1 side panel piece each fabric 62 x 10 cm (24.25 x 4")
1 back piece each fabric 22 x 11.5 cm (8.75 x 4.5")
Extra inner fabric (rip-stop nylon is ideal) for binding the seams.

Foam Insulation (an old car windscreen shade is ideal)
2 main panels - foam template - click here for free download
1 side panel strip 59 x 6 cm (23.25 x 2.5")
1 back panel 18 x 8 cm (7 x 3.25")

Zip  
1 zip 62 cm (24.25") 

Handle
Piece of webbing (or cutting from old bag strap) 28 cm (11") long and approximately 4 cm (1.5") wide


First of all take your long side outer fabric panel and your handle.
To seal the ends of your handle - heat gently using a lighter to melt, seal and prevent fraying.

Now pin one end of your handle in the centre of the end of your long side panel and pin the other end 20 cm (8") from that edge.

Stitch both ends of the strap into place securely in the shape of a box with cross in the middle, like this:


Now you need to put the 4 panels of your bag together, each piece will have outer fabric, inner fabric and a foam piece sandwiched in between. Make sure the outer and inner fabric pieces are 
WRONG SIDES TOGETHER.
Pin around all 4 edges of each panel and stitch together. Use a 2/8" seam around all these pieces. The foam part should sit in the middle and the stitching should run around the outside of it.

Repeat this pinning and stitching the other 4 pieces together.

You should now have 4 bag panels ready to assemble into your lunch bag.


To assemble you first need to attach the zip to the long side panel. Place the zip face down along one long edge of the panel. Then lay a strip of your extra inner fabric (around 4 cm (1.5") wide) on top of the zip (this is to bind the seam and hide the raw edges) and pin through all layers.


Using the zipper foot on your machine stitch along the long edge where you have pinned.
Trim the edges in line with your panel.

Now to use that extra strip of fabric you just attached to the zip to bind the seam and hide those nasty raw edges.
Basically you double fold the fabric over the seam and pin it to hide the raw edges. The finished seam will stick out from the other parts but will be fully enclosed.


Now to join the small back panel to this long side panel. Place one edge of the long panel right sides together with one edge of the back panel. Once again as you pin these together, add a strip of fabric to bind the seam afterwards. Now you need to start making your seams 3/8" to make sure you hide all your previous stitching.

After stitching the pieces together, fold the binding fabric double over the seam, pin and stitch to hide the raw edges.


Now join the other ends of both the side and back panels together - make sure they are right sides of the outer fabric together, and once again add a strip of binding fabric and enclose the raw edges of the seam.

You should now have the outer edge of your lunch bag ready to attach to the two main panels. First the base.

Pin one of your main panels right sides together to the bottom of your bag side panel (the edge without the zip!)


Stitch all the way around.


Now is where you add your fabric to bind the seam. Pin, then stitch, a strip all the way around the seam you just stitched. Fold and overlap the edges of this binding strip so there is no raw edge showing where they join!

Then double turn it over and stitch to enclose all the raw edges. Your bag should now look like this.


Finally you can attach the top panel to your bag. Open the zipper and pin the zip edge and top of the back panel to the top panel of the bag,. Right sides together.


Once you have stitched all the way around, it's time to add one final strip of binding to enclose your last seam and raw edges.


Once you have finished this binding, your lunch bag is finished!


Here are the three bags I made together.


Which is your favourite? Mine is the Kitty one in the middle - mostly because it's made from so many different parts and so has the best 'story' - old clothes for the main fabric, the zip from an old school bag, the lining from an old pool toy, the foam insulation from old lunch bags and car windscreen shades and the handle from an old backpack! Awesome!!

My girls both like the the green and brown one with the turtles and leaves in the design of the fabric!

For the free downloadable PDF version of this tutorial, click here.


If you liked this tutorial, then take a look at the other free sewing tutorials I have available here. There are over 100 for all kinds of things to make and all levels of sewing ability!


For example you could make a coordinating water bottle carrier to go with a lunch bag for back to school!


I shall be linking this post to many of the fabulous linky parties whose pretty buttons and direct links can be found on my linky party page.

Thursday, 29 October 2015

Witchy Messenger Bag


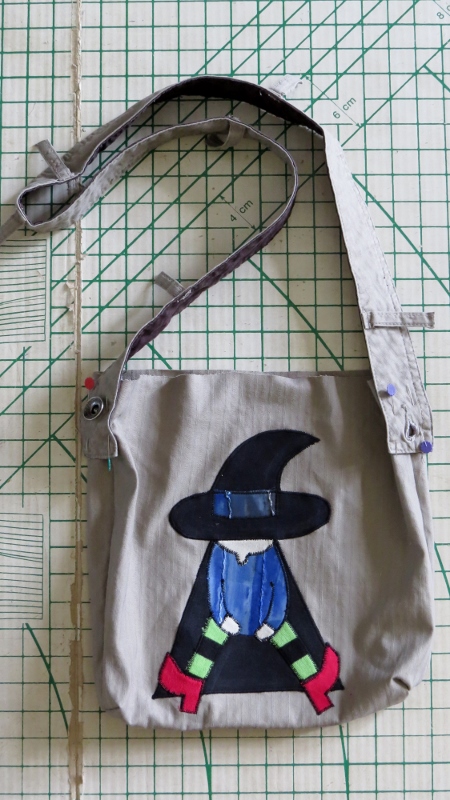
One of the last clothes upcycles I did for my daughter's carnival stall was this cute Witchy Messenger Bag.
I made it from a pair of jeans and an old shirt and used my own messenger bag from jeans tutorial here.

I was really happy that I found a great use for the collar of the shirt - as a skirt for the witch.

 I think this collar-skirt works well and will definitely be using that idea again in the future!
 I also love that I found another use for the green and black socks. I made a sock monkey from the main part, 
but there was still some of the socks left over as they were quite long - that's what I used for the witches socks appliqué!

And the purple shirt fabric works really well for the lining of this bag. And the rustic look of the worn jeans pocket is another feature I really like!


Well that's my final Halloween project for this year!
I shall share a final few Halloween features from the Round Tuit party tomorrow - in case you want any last minute spooky inspiration!


Wednesday, 21 October 2015

Witchy Bag - Upcycled from Shorts and a Top


With the school carnival in just 2 days time, this is one of my last upcycles for the class stall.

It's a shoulder bag with a zip and a witch appliqué on the front. All made out of a pair of (long) shorts and a top.


Here's how you  can upcycle a pair of shorts yourself to make one of these bags.

What you will need:

Zip
You will need a zip - I unpicked and used the one on the pair of shorts which was 20 cm (8") long. You could use one that was longer, but not any shorter.

Also cut 2 scraps of both the outer and inner fabric approx 10 x 5 cm (4 x 2"). this is for the ends of the zip.
2 pieces each of inner and outer fabric, 32 x 6 cm (12.5 x 2.5"). This is for the sides of the zip

Main bag part
Cut from your shorts or main fabric:
2 pieces 32 x 28 cm (12.5 x 11")
 Cut the same 2 sized rectangles from your inner fabric.

The strap
Carefully cut the waistband from your shorts for the strap.


Witch appliqué
Fabric scraps and fusible webbing
Sitting Witch Template - click here to download.

First take one of your outer bag main bag rectangles and your appliqué pieces. Use the fusible webbing to iron on the back of your fabric scraps and trace the parts of the witch template onto each fabric you have chosen. Cut the pieces out and iron into place in the centre of your main bag part.

Use a tight zig-zag stitch or the appliqué setting on your machine to stitch around all parts of the witch.


Now place this main bag part and the other main outer bag rectangle. Place them right sides together matching the edges and pin then stitch around the side and bottom seams.


Box the corners of your bag out to make a flat base for the bag. To do this, put your hand up inside your bag to one of the corners.

Pinch the corner flat so that the side and bottom seam are in line together. Pin across the 'triangle' shape you have made.

Repeat this with the other bottom corner of your bag.

Stitch across the corners where you have pinned. Your line of stitching should be 2.5cm (1") in from the tip of the triangle.

Trim off the end of this triangle close to the stitching. Repeat for the other corner.


Now to add the strap. 

First take your waistband and either unpick each belt loop to remove or stitch the other ends down and trim as I have done here.
I like the belt loops as an extra 'feature' on the strap, and a place to perhaps clip on keys or a small pouch!


Turn your bag right sides out, and pin the ends of your waistband strap to the sides of your bag - matching it up with the side seams.

Make sure your strap goes down about 6 cm (2.5") from the top edge of the bag.


Stitch each strap into place with a square and a cross stitched across the centre of the square at the end of each strap.


Inner Bag
Now take your inner bag pieces and place them right sides together. Pin then stitch them around the side and bottom seams as you did for your outer bag, but this time leave a gap of around 10 cm (4") in your side seam. You will need this to turn your bag right sides out when you finish your bag.

Box the corners of your inner bag out just as you did for your outer bag.


The Zip
Take your zip and the scraps for the ends.
Place one scrap from your inner fabric and one from your outer fabric on either end of the zip. Place these fabrics right sides together on either end of the zip. The outer fabric should be facing the front of the zip. Pin at the ends.

If you gently pull your fabrics back from the zip, this is what is should look like.


Stitch across where you have pinned, then trim the ends of the zip and fabric outside your stitching.

Pull back your fabric to expose the zip and trim in line with the long zip edges.
You now need this zip plus the four side zip pieces.

Place your zip face down on top of one of your outer pieces, then lay an inner piece face down on top of this. Match up the top edges.
Pin then stitch along the top edge, using your zipper foot.


 Now pull back both fabrics from the zip and top stitch along the edge of the zipper teeth,. This will prevent the fabrics from catching in the zip teeth when you open and close the zip.


Now lay this piece face down on top of your other outer piece, and then place the inner piece face down on top of the whole thing. Line up the top edges.


Pin, then stitch across the top edge with your zipper foot.


Then once again pull back the fabrics and top stitch close to the zip teeth.


Trim around all 4 edges to neaten.


Putting the bag together
Take your zipped rectangle and your outer bag which is still inside out.

With the right sides of both outer fabrics facing each other, pin these two pieces together around the edges of the zip rectangle and the top opening of the bag. You may need to pinch the corners of the zip rectangle to fit. Stitch all the way around.


No take your inner bag piece - right side facing out and push this inside your outer bag. The right sides of both inner and outer bag pieces should be facing.


Again, pin, then stitch all the way around the top edge


Turn your bag right sides out through the gap you left in the side seam of your inner bag.


Then pin and stitch this gap closed.


Finally top-stitch around the opening of your bag to hold the inner and outer fabrics together in line.


And there you have - a witchy bag made out of a pair of shorts!


A perfect upcycled bag for Halloween don't you think?


I hope you liked this tutorial. If you did, there are plenty more to browse through - from other bags and upcycles to things to make for kids or the home. I have over 100 free sewing tutorials available for all levels of sewing ability on 


I shall be linking this post to many of the fabulous linky parties whose pretty buttons and links can be found on my linky party page.